QA Plugin: Solving for Attribute Chunk

The Issue

The @chunk="to-content" requirement for the QA plugin has always been a bit sticky. Honestly, I hadn’t thought much about it since we run the QA plugin through a self-service web server and that attribute is handled by a Python controller. However, thinking in terms of local builds, it became evident that setting the @chunk by hand would quickly become a tiresome routine.

Besides attribute handling, the web server also masks another consideration—the QA plugin may not be running in isolation from other plugins.

 The First Iteration

The first iteration of to move this functionality to the plugin itself resulted in a new build target extending the chunk preprocess.

In plugin.xml:

<feature extension="depend.preprocess.chunk.pre" value="setchunk"/>

The target in build_qadata.xml:

<target name="setchunk" description="Set @chunk to-content on the temp input bookmap" if="if.chunk">
<replace file="${dita.temp.dir}/${user.input.file}"
token="chunk=.to-content." value="" />
<replace file="${dita.temp.dir}/${user.input.file}"
token="&lt;bookmap " value="&lt;bookmap chunk='to-content' " />
<replace file="${dita.temp.dir}/${user.input.file}"
token="&lt;map " value="&lt;map chunk='to-content' " />
</target>

The new target used a regex replace to add the chunk attribute just before processing began in the temporary build directory. This solved the problem of manually setting the attribute, but also extended the chunk pre-processing to other sibling plugins as well.

The Solution

It’s possible to add an if-condition to a target to look for the presence of a command-line parameter, but I needed to look for a parameter with a specific value.  A second iteration added a double-hop if-condition to the ant call.

<condition property="if.chunk">
<equals arg1="${setchunk}" arg2="true" casesensitive="false" />
</condition>

<target name="setchunk" description="Set @chunk to-content on the temp input bookmap" if="if.chunk">
<replace file="${dita.temp.dir}/${user.input.file}"
token="chunk=.to-content." value="" />
<replace file="${dita.temp.dir}/${user.input.file}"
token="&lt;bookmap " value="&lt;bookmap chunk='to-content' " />
<replace file="${dita.temp.dir}/${user.input.file}"
token="&lt;map " value="&lt;map chunk='to-content' " />
</target>

This approach looks for the presence of the setchunk switch and a value of true before applying the target, which is called with:

dita -f qa -i samples/taskbook.ditamap -Dsetchunk=true

So if you run the QA plugin alongside any others, you can leave off the switch to avoid unwanted chunk attributes.

cheap football kits  |
cheap football shirts  |
cheap football tops  |
cheap football kits  |
cheap football shirts  |
cheap football tops  |
cheap football kits  |
cheap football shirts  |
cheap football tops  |
cheap football kits  |
cheap football shirts  |
cheap football tops  |
cheap football kits  |
cheap football shirts  |
cheap football tops  |
cheap football kits  |
cheap football shirts  |
cheap football tops  |
cheap football kits  |
cheap football shirts  |
cheap football tops  |
cheap football kits  |
cheap football shirts  |
cheap football tops  |
cheap football kits  |
cheap football shirts  |
cheap football tops  |
cheap football kits  |
cheap football shirts  |
cheap football tops  |
cheap football kits  |
cheap football shirts  |
cheap football tops  |
cheap football kits  |
cheap football shirts  |
cheap football tops  |
cheap football kits  |
cheap football shirts  |
cheap football tops  |
cheap football kits  |
cheap football shirts  |
cheap football tops  |
cheap football kits  |
cheap football shirts  |
cheap football tops  |

QA Check Compiler

We’ve been working on some enhancements for the QA plugin that are now available. You can download the plugin from GitHub.

The first enhancement I want to talk about is the QA check compiler.

Writing a QA script in PowerShell was a pretty keen idea even if I do say so myself. Moving to an Open Toolkit plugin was an even better idea with better execution. One of the drawbacks to the OT mechanism, however, is how complicated the expression of a simple check is.

For example, let’s say you want to flag occurrences of utilize and suggest use instead. This is the expression you have to write:

<xsl:if test="descendant::*[not($excludes)]/text()[matches(.,'utilize', 'i')]">
  <data type="msg" outputclass="term mmstp" importance="recommended">Found "utilize". Use "use".</data>
</xsl:if>

The contents of the matches call and the value and attributes of the data element are all significant and also very repetitive. As we all know, repetition leads to errors.

Authoring Checks for use with the Compiler

With the QA check compiler, you author the checks in an abbreviated form. The checks go inside a properties table inside a DITA reference topic. To express the example rule above, just add a row to a properties table to specify the severity, expression, and message.

The QA compiler, executed by the compilechecks target, takes care of the converting the rows in the properties tables to checks that the plugin can execute.

  • The propdesc becomes the message for the check.
  • The propvalue becomes the argument to the matches function in the XPath expression.
  • The proptype becomes the @importance.
  • The @id of the parent properties table becomes the @outputclass of the check.

You can have as many properties tables as you want.  If the @id is term_mmstp the resulting category will be term mmstp. (Spaces aren’t allowed in @id, so an underscore is necessary but then replaced with a space in the output.) These categories are unconstrained–you can make them whatever you want.

The proptype element is limited to the values for @importance: default, deprecated, high, low, normal, obsolete, optional.

Enabling the QA Compiler

The result of the QA compiler isn’t enabled by default. To do so, uncomment the xsl:include call in xsl/qa_checks/_qa_checks.xsl and also remove the term template from that stylesheet. The QA compiler produces a template called term to make it easy to integrate, and you can’t have two templates with the same name. Once the result is included, you can start adding and modifying checks in tools/qacompiler/qa_checks_r.dita, which is a DITA reference topic. Don’t forget to run ant compilechecks after editing the DITA topic.

cheap football kits  |
cheap football shirts  |
cheap football tops  |
cheap football kits  |
cheap football shirts  |
cheap football tops  |
cheap football kits  |
cheap football shirts  |
cheap football tops  |
cheap football kits  |
cheap football shirts  |
cheap football tops  |
cheap football kits  |
cheap football shirts  |
cheap football tops  |
cheap football kits  |
cheap football shirts  |
cheap football tops  |
cheap football kits  |
cheap football shirts  |
cheap football tops  |
cheap football kits  |
cheap football shirts  |
cheap football tops  |
cheap football kits  |
cheap football shirts  |
cheap football tops  |
cheap football kits  |
cheap football shirts  |
cheap football tops  |
cheap football kits  |
cheap football shirts  |
cheap football tops  |
cheap football kits  |
cheap football shirts  |
cheap football tops  |
cheap football kits  |
cheap football shirts  |
cheap football tops  |
cheap football kits  |
cheap football shirts  |
cheap football tops  |
cheap football kits  |
cheap football shirts  |
cheap football tops  |

QA Plugin Use Case: Learning Engagement

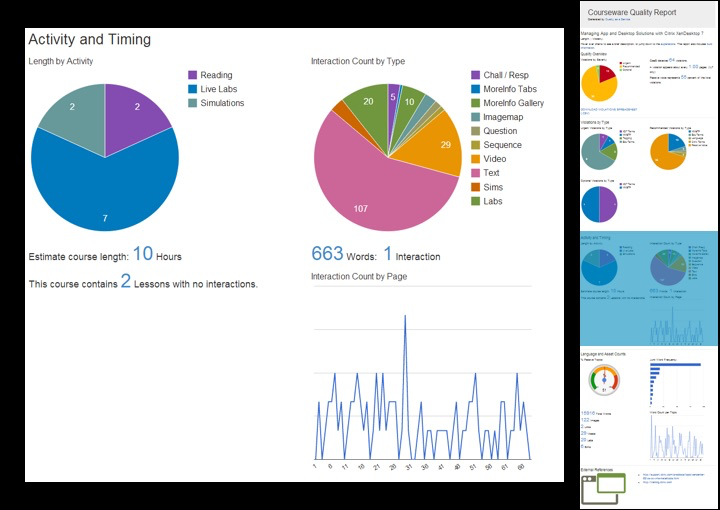
I thought it would be useful to share a use case for the QA Plugin from the Education team at Citrix. In addition to the metrics in the open-source code, we’ve added a number of our own used to measure the quality of instructional design in our courses. For example, we calculate what we call an “engagement ratio”, which is the ratio of words to interactions. We find a good target is 250 words to each interaction. The ratio gives us a single metric that tells us, at least directionally, whether the course will offer a sound experience for the student.

Of course, if the content uses a lot of “click to see more text” interactions, then a low ratio may be misleading. That’s why we also total up the number of each interaction type. Showing these two metrics together gives us a solid understanding of the variety and frequency of interaction in a course.

In addition, we are able to calculate reading time vs other activities, like videos, labs, and simulations, as well as an estimated total course length. Therefore, we have language metrics telling us about terminology and style use, interaction metrics telling us about variety and frequency, and timing metrics about various activity types. Those metrics combined give us a accurate picture of how engaging a course will be, without having to read a single page.

But, you know, you should still read the course. 🙂 But with the QA plugin, you know where to focus, what issues you are likely to encounter, and how much work you are likely to need in order to get the course ready for release.

If you have a use case for the QA plugin, please let us know! We’d be more than happy to feature it here on ditanauts.

QA Plugin Updated! (Finally, right?)

Hi folks, I’m happy to let you know that we have posted a major update to the QA Plugin. The ditanauts team owes a huge debt of gratitude to Don Day and Michael Boses for their work on this update. What’s new you ask? Well…

  • Reports are prettier. The HTML report we generate uses Google Charts to render visual elements.
  • We create a data file (written in DITA) rather than generating the report HTML directly from the DITA input. With the data file, you can then render whatever you want using normal OT processing. The plugin creates an HTML report and a .csv file from the data file.
  • @Chunk set automatically on bookmaps. One of the really annoying things with the old version was that you had to set the @chunk attribute manually before a build. That is no longer the case when building from a bookmap!
I’ve updated the install and run sections of the how-to page; I will be updating the customization section soon.
Let us know what you think!

QA Plugin XSLT: Locating Distinct Values for Duplicate IDs

As part of a new framework enhancement, I needed a method to ensure that certain DITA elements carried unique @id values. Our authoring tool does a good job identifying duplicate @id values within a topic, but does not indicate whether those values also exist in other topics referenced in the DITA map.

In this case, the best fit was to add a new check to the QA plugin.

The check should:

• Identify duplicate @id values on specific elements
• Return only distinct values (i.e. if 123 appears several times, then return 123 only once)

After some forum research, my first thought was to use a key match.

<xsl:key name="duplicateIds" match="elementName" use="@id" />

And reference it with

key('duplicateIds',@id)[2] and count(.|key('duplicateIds', @id)[1]) = 1

So the if statement for the check looked like

<xsl:for-each select="//parentElement">
<xsl:if test="key('duplicateIds',@id)[2] and count(.|key('duplicateIds', @id)[1]) = 1">
Remove duplicate elementName @id=<xsl:value-of select="@id"/>
</xsl:if>
</xsl:for-each>

Even though it met my requirements, it’s still an outdated approach that didn’t leave me with a job-well-done sense of completion. I wanted a cleaner solution that fit somewhere closer to the 2.0 realm.

I decided to use grouping to identify each distinct @id value. Then I could wrap an if statement to test for any groups that contained a second (duplicate) item. The result:

<xsl:for-each-group select="//elementName" group-by="@id">
<xsl:if test="current-group()[2]">
Remove duplicate elementName @id=<xsl:value-of select="@id"/>
</xsl:if>
</xsl:for-each-group>

Have a better approach? Leave a comment.